Monday, August 6, 2012

What to do with Large Zucchini?

We went to my son's in Pocatello, Idaho this weekend and he fixed us dinner Saturday night.  He fixed Stuffed Zucchini Cups.  You use oversized zucchini.  It was very good.
Meat, Tomato, and Mozzarella Stuffed Zucchini Cups
(Makes 6-8 servings, recipe created by Kalyn)

Ingredients:
2 large zucchini or yellow squash, about 12 inches long
2 tsp. + 2 tsp. olive oil (may need more, depending on your pan)
1/2 cup finely chopped onion
1 green pepper, finely chopped
2 T finely minced fresh garlic
1 lb. ground beef (10% fat or less)
12 oz. ground turkey (10% fat or less)
(use any combination of ground meat you'd like, but use low-fat ground meat for the South Beach Diet.)
1-2 tsp. Spike seasoning (optional but recommended)
2 C flavorful tomato-basil pasta sauce
2 cups low-fat mozzarella or other mild white cheese (I used low-fat blend of six cheeses called Italian blend.)

Instructions:
Preheat oven to 350F/175C. Chop onion and green pepper. Heat 2 tsp. olive oil in a non-stick pan, then saute onion and pepper for 3-4 minutes, until just starting to soften. Add minced garlic and saute about 1 minute more, being careful not to brown the garlic. Remove the onion, pepper, and garlic mixture to a bowl.

Add 2 tsp. more olive oil to the pan. Crumble in the ground beef and ground turkey, season with Spike seasoning, and cook over medium heat until the meat is well browned. Tilt pan to see if there is any extra fat, and remove with a spoon if there is, then stir cooked vegetables and garlic back into the meat. Add tomato sauce and simmer until the mixture has thickened and liquid has cooked off, about 10 minutes, then turn off heat.

While meat cools, cut zucchini into 2 inch thick slices, discarding ends. Use a sharp spoon or melon baller to hollow out a cup in each zucchini slice, leaving just over 1/4 inch of zucchini flesh. Be careful not to get too close to the skin or the cups will leak liquid when they cook.

Spray baking sheet with nonstick spray and stand up zucchini cups, open end up. Stir 1 1/2 cups grated cheese into the cooled meat mixture (it doesn't need to be completely cool), then spoon the meat-cheese mixture into zucchini cups, pressing down with the spoon and mounding it up a little over the top of the zucchini.

Bake zucchini cups for 20 minutes, then remove from oven and use remaining cheese to top each one with a generous pinch of cheese. Put back in oven and bake 10-15 minutes more, until zucchini is slightly soft when pierced with a fork and cheese is melted and lightly browned. Serve hot.


I think when I do them, I will parboil the zucchini and season it a little.  Other than that, they were very good.

What else to do with Zucchini?  I think everyone that grow zucchini can answer that question.  I made a very good Zucchini Chili.

Zucchini Chili4-6 c. grated unpeeled zucchini
1 c. sliced celery
1 med. onion chopped
1 (15 oz.) can tomato sauce
15 oz. water (use the empty tomato sauce can to measure)
1 (29 oz.) can whole tomatoes & liquid
2-3 Tbs. chili powder
1 teaspoon garlic salt
2 Tbs. sugar (optional)
1 tsp. pepper
1 (15 oz.) can kidney beans
1 small can mushrooms (optional)
Sauté' zucchini, celery and onion in non-stick skillet water till celery is tender, but not browned.
Add tomato sauce, water, canned tomatoes, chili powder, garlic salt, sugar and pepper. Simmer slowly uncovered 1-1 1/2 hrs. Add beans and mushrooms. Simmer another 10-15 minutes. Serves 8.
This is a recipe from the  McDougall Recipe Board.  We've had it a couple times and it is very good.

My family really like this zucchini recipe. You can use lots of zucchini in it.

CORNMEAL ZUCCHINI CASSEROLE
Crust:
1 c. yellow cornmeal                            1 ½ tsp. salt
1/4 tsp. pepper                                    1 onion grated
1 c. cold water                                     1 T. parsley flakes
Filling:
4 c. sliced small zucchini
½ lb. hamburger
2 thinly sliced Italian sausage
1 can sliced mushrooms
1 clove garlic, minced
1 c. finely diced onion
1 c. sliced black olives
1 c. tomato sauce
1 c. tomato paste*
1 pkg. dry spaghetti sauce mix*
Parmesan cheese
Mix together in small bowl cornmeal, salt, pepper, onion, water and parsley flakes. Add
slowly to 1 3/4 c. boiling water. Cook. Stirring until mixtures comes to a boil again. Then
cook on very low heat until thick. (less than 10 minutes) Pour into buttered 8 x 8 pan, chill,
then cut into 1 " cubes. Fry zucchini, hamburger and sausage. Add remaining ingredients except Parmesan cheese. Put squares of cornmeal in bottom of 9 x 13 pan. Put zucchini mixture over top.  Sprinkle with Parmesan cheese. Bake at 350 for 45 ‑ 50 minutes.

*Notes. I don't do crust ahead. I just mix it and spread it in the 9 x 13 pan. I also don't use tomato paste. I use a 15 oz can of tomato sauce. I also leave out the olives (don't like those little critters.  Never have, never will!!) . I sometimes leave out the sauce and the paste and the dry spaghetti sauce mix and just put in a can (24-28 oz.) of spaghetti sauce.  I have also made this a vegetarian recipe and left out the hamburger and the sausage. 

As you can see, this is a very versatile recipe.  Adjust it to your tastes.

Wednesday, August 1, 2012

Zucchini Southwest Pie

I found this recipe last year on Happyherbivore.com.  It has tofu in it and I have never been a fan of tofu.  I think part of that is a brain thing.  I have to get it past my brain before I eat it.  Tofu has no real taste but takes on the flavor of what you are putting it in.  But it is zucchini season and this recipe uses zucchini. 
Picture of Southwest Zucchini Pie

SOUTHWEST ZUCCHINI PIE
2 cups zucchini, diced
1 cup corn, frozen
1 whole onion, diced
3 whole garlic cloves, minced
¼ tsp turmeric
1 tbsp non-dairy milk
½ cup cornmeal
½ cup non-dairy milk
2 tbsp cornstarch
Preheat oven to 375 F. Spray 9x9" pan and set aside. Sauté onions in a 1/3 cup water over high heat. After 2 minutes, add garlic. After 2 more minutes, add spices and chilies. Stir to coat and cook until water has evaporated and set aside. Whisk non-dairy milk and cornstarch together and set aside. Blend tofu with 1 tbsp non-dairy milk until smooth. Combine all ingredients in a large bowl and stir to combine evenly. Transfer mixture to pan, spreading it evenly. Top with vegan cheddar cheese if desired and bake 20-30 minutes or until center is cooked and the top is crisp.

I used the 10 oz. box and it worked great.  I didn't use the green chilies or the chipotle powder.  I used green peppers and added a little cayenne pepper.  I also didn't add the cheese on top.  But it was still good. I also added about 2 3/4 c. zucchini.  Never have too much zucchini right?  My husband even commented on how good it was.  This recipe is definitely a keeper.  Enjoy!!!

Wednesday, June 27, 2012

Bread in a Tin Can

I can't believe it's been almost a month since my last post.  Boy, does time fly.  Been busy taking advantage of the sunshine.  We haven't had much of that this  money.  Lots and lots of rain.  At least I haven't had to use the sprinklers!!!! 
Saw a post on Pinterest today that I thought was clever.  I made whole wheat bread and have been making sandwich thins, like the ones at Costco.  Only mine are lots cheaper.  But I saw an idea that might work as good.  You can bake the bread in a tin can.  Woo Hoo, perfectly shaped slices of bread.


http://www.thereadystore.com/containers/2908/what-to-do-with-a-leftover-10-can-part-2/

Wednesday, May 30, 2012

30 Minute Rolls

I saw this idea on Pinterest and checked it out.  My first thought was,"I don't think so."  How can you make rolls in 30 minutes and still have an edible product.  Well, Sunday I had company for dinner and decided to give it a try. (#1 rule when having company is DON'T try a new recipe!!!) Anyway, I tried it and they were wonderful.  I will definitely try them again.  Next time I will try and use at least 1/2 whole wheat flour. 


30 Minute Rolls
adapted from: Real Mom Kitchen

1 c. plus 2 Tbl. warm water
1/3 c. vegetable oil
2 Tbl. active dry yeast (yes, you read that right! 2 tablespoons!)
1/4 c. sugar 
1/2 tsp. salt
1 egg
3 1/2 c. all-purpose flour

Preheat oven to 400 degrees.  In the bowl of a stand mixer, combine warm water, oil, yeast and sugar; let rest for 5-10 minutes or until frothy and bubbly.  With a dough hook, mix in salt, egg and 2 cups of flour until combined.  Add remaining 1/2 cup flour at a time (dough will be sticky).  Spray your hands with cooking spray and shape the dough into 12 balls.  After shaped, place on lightly greased cookie sheet and let rest for 10 minutes.  Bake for about 10 minutes or until tops are lightly golden.  Yield: 12 good-sized rolls.  You can also use this same dough for cinnamon rolls!  

They were good sized rolls. If you wanted smaller rolls you could probably get 15 rolls.   Very tasty.

Wednesday, May 23, 2012

Flatbreads with Creamy Red Pepper Scallion Spread

Well, I've been surfing the net and this is tomorrow nights dinner.
Flatbread
For the Flatbread:
  • 1 tablespoon sugar
  • 1 cup warm water
  • 2 tablespoons olive oil, plus more for the bowl
  • 2 1/4 teaspoons yeast
  • 2 cups bread flour (or a little less, see directions)
  • 1/2 cup medium grind cornmeal
  • 1 teaspoon salt
For the Scallion Spread:
  • 1/2 cup cashews (unroasted)
  • 2 cloves garlic
  • 1 pound extra firm tofu, drained
  • 1/4 cup fresh lemon juice
  • 1 tablespoon olive oil (optional, but it makes it a bit more creamy)
  • 2 tablespoons nutritional yeast
  • 3/4 teaspoon salt
  • Fresh black pepper
  • 1 cup chopped scallions
  • 1/2 a red bell pepper, seeds removed, chopped
For the salad:
  • 6 cups baby mixed salad greens
  • 3 tablespoons fresh lemon juice
  • 1 tablespoon olive oil
  • Big pinch salt
To serve:
  • A handful of toasted walnuts
  • Additional thinly sliced red bell pepper (the remainder of the half you used for the spread)
Make the spread:
In a food processor, chop the cashews into coarse crumbs. Add the garlic and pulse to incorporate. Crumble the tofu in your hands and drop it in. Add the lemon juice, olive oil (if using), nutritional yeast, salt and pepper and blend until relatively smooth, a little texture from the nuts is great.
Add the scallions and red pepper and pulse until they’re chopped into tiny bits. You don’t want them to be completely pureed, make sure that there’s some crunch from the red peppers.
Taste for salt and seasonings. If it needs anything else, don’t puree again, just remove the blade, scrape everything into the bowl and gently mix in with a fork. Cover and refrigerate until ready to use.

Make the flatbreads:
Add water and sugar to the bowl of a standing mixer fit with a dough hook. Sprinkle in the yeast and let sit for 5 minutes to bloom.
Mix in the olive oil then Add one cup of the flour along with the salt. Mix on low until well incorporated, and then turn the speed up to medium and mix for 3 minutes.
Add another 1/2 cup of flour and the 1/2 cup of cornmeal, and mix well, starting on low and then switching to medium speed. Then add another 1/2 cup of flour, again starting on low and switching to medium. Knead on medium for about 5 minutes. You may occasionally have to get in there with your hands if the dough starts climbing up the hook. It should become smooth and elastic and slightly tacky. At this point, incorporate flour by the tablespoon, with the mixer running. When it starts to seem dry, stop adding flour. This could be anywhere between 1/4 and 1/2 cup. Knead again on medium until it is elastic easy to stretch, about 8 more minutes.
Meanwhile, drizzle about two tablespoons of olive oil into a large mixing bowl. The dough will double in size, so make sure you have enough room. Form the dough into a ball and place in the bowl, tossing it around to coat with oil. Cover the top in plastic wrap and put in a warm place. Let dough rise for about an hour, or until doubled in size.
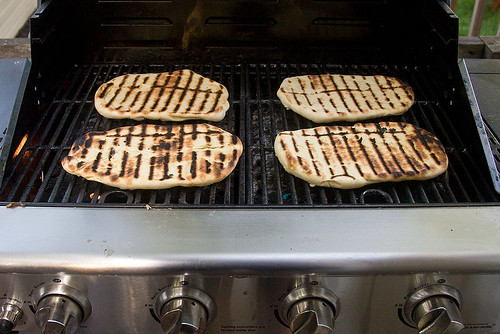
When dough has doubled, fire up your grill. Keep the flame high and close the lid. If you have a thermometer, it should be at about 500 F.
Punch the dough down, give it a quick knead and tear it into 4 equal-ish pieces. On a large cutting board, form each piece into an oval that is about 8 inches long and 5 inches across. I just use my hands for this, but you can use a rolling pin if you prefer.
Place the dough on the grill. It should take about 3 to 4 minutes for the bottoms to get grill marks and become firm. If it takes a little longer that’s cool, but definitely check one after 3 minutes. Use tongs to flip the bread over and cook for another 2 minutes or so, until grill marks appear.
Remove breads from the grill with tongs and place on the large cutting board. Keep covered with a kitchen towel to keep warm until ready to use.

Prepare the salad:
At the last minute so that they’re as fresh as can be, use a large bowl to toss the salad greens with lemon, olive oil and a big pinch of salt.
Assemble:
Use the back of a spoon to spread the Scallion Spread onto the flatbread. Top with handfuls of dressed greens and scatter on toasted walnuts and red pepper, if desired. Slice in half with a pizza slicer, if you like, and serve! (Confession: we did not slice these in half, we just gobbled them down.)

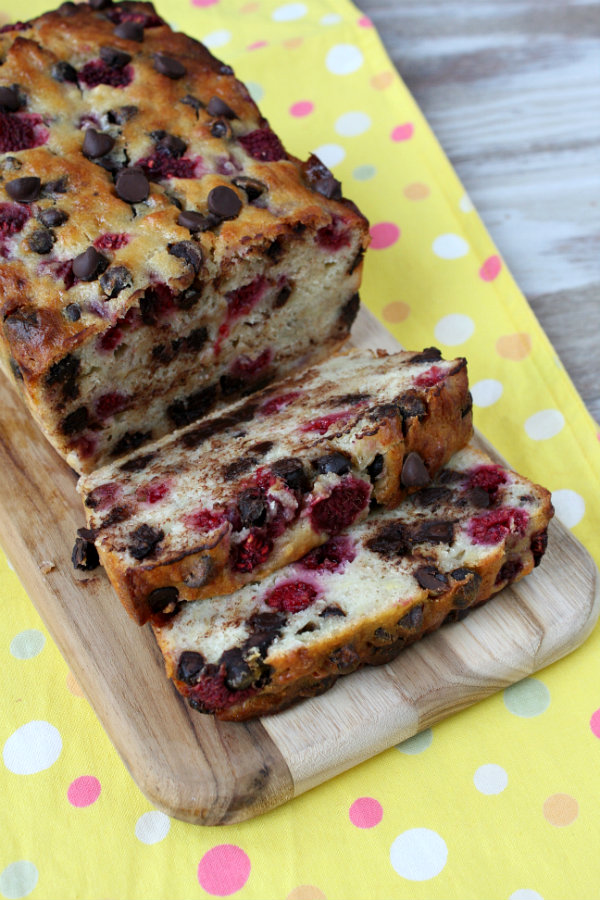
Raspberry-Dark Chocolate Banana Bread

Raspberry season is fast approaching, about 5 or 6 weeks.  Here's a recipe I think sounds great.  I'll have to give it a try and let you know how it turns out.

 
Yield: 1 loaf
Prep Time: 15 min
Cook Time: 50 min
I love raspberries more than any other fruit, so it was time to add them to banana bread!

Ingredients:

2 cups all-purpose flour
3/4 teaspoon baking soda

1/2 teaspoon salt

1 cup granulated white sugar

4 tablespoons (1/2 stick) unsalted butter, at room temperature

2 large eggs

1 1/2 cups mashed ripe banana (about 3 bananas)

1/3 cup plain low fat yogurt

1 teaspoon vanilla extract
1 cup dark chocolate chunks or chips
1 cup halved raspberries, tossed in 1 tablespoon all-purpose flour

Directions:

1. Preheat oven to 350°F. Spray a 9x5-inch loaf pan with cooking spray.
2. In a medium bowl, whisk together the flour, baking soda and salt.
3. In a separate large bowl, beat the sugar and butter with an electric mixer at medium speed until well blended (about 1 minute). Add the eggs one at a time, beating well after each addition. Add the banana, yogurt, and vanilla; beat until blended. Stir in the flour mixture; just until moist. Don't over-mix. Stir in the chocolate chunks and then gently stir in the raspberries. If you want, you can sprinkle a few additional chocolate chunks and raspberries on the top to make it look pretty.
4. Spoon the batter into the prepared pan. Bake for 50 to 60 minutes or until a wooden pick inserted in center comes out clean. Cool 15 minutes in the pan on a wire rack. Remove from pan and cool completely on the wire rack.

Raspberry- Dark Chocolate Banana Bread

MAKING FOIL DINNERS

I remember when I was dating my now husband.  We loved to go on hikes.  I remember the first time we made foil dinners.  I had never done them before.  In fact, I had never heard of them.  The boy scout that he was, told me how to do them and he got the fire ready.  I prepared them and had them all ready to put on the coals.  I asked, "how long do you cook them?"  His reply, "I think about 20 minutes, 10 minutes on each side".  For those of you that have done foil dinners know that we ate cremated foil dinners.  Time varies, but it should have been 10 minutes total, 5 minutes on each side.  Thru the years we now have foil dinners down to an art.  There are lots of things you can put in a foil dinner, but we always seem to go back to the basic hamburger, onions, potatoes and carrots.  Here's a website that tells of 9 different foil dinners.  Not all are main dishes, some are sides, some are desserts. http://artofmanliness.com/2010/07/20/cooking-around-the-campfire-9-easy-and-delicious-foil-packet-recipes/

Didn't realize it had been so long since I posted last.  You know the saying "time flies when you are having fun".  Well, I can't say I was having that much fun, but time did fly.  It has been so wet and rainy here.  Once the rain sets in, it doesn't seem to know when to quit.  Have had a little time to surf around Pinterest.  I love Pinterest.  Have found lots of great ideas there.  Here are a few of the recent ones I have found. 
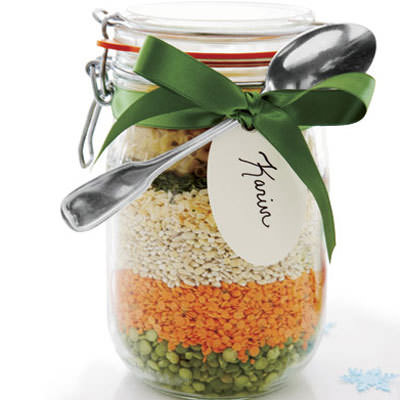
http://www.tipjunkie.com/gifts-in-a-jar/  This website has 37 gifts you can do in a jar.  Very creative.
all crafts 37 Recipes How To Make Gifts In A Jar

Have always thought mixes in a jar were a great gift.

all crafts 37 Recipes How To Make Gifts In A Jar

all crafts 37 Recipes How To Make Gifts In A Jar

A couple of years ago for Christmas, my daughter gave us several of these mixes in a jar.  They were great. 
We really enjoyed them.

Wednesday, April 25, 2012

Unusual Planters

I was looking on Pinterest today for some ideas for containers.  What does most everyone have lots of?  SHOES!!!!  The only problem I see with using small containers, like shoes, is that they have to be water more often.  I have a couple old wagons and a couple old wheelbarrows that I use for planters and they have to be watered every day. If they were planted with succulents they wouldn't need to be watered as often.
 Pinned Image

shoe planters                 Pinned Image

         Shoe planters             FATHER’S DAY SHOE PLANTERS

Pinned Image        Shoe Planters

anything can be a pot      .   anything can be a planter

Hypertufta Pots

I got this idea a couple of years ago visiting a mall in Pocatello, Idaho.  They are called HyperTufta Pots.
You can use just about anything for a mold.
Concrete bowls
Step 1: Gather Your Materials
    You may have many of these supplies on hand. The remainder can be found at a building supply store to make a trough that measures 16x16 inches.
    Tape
    Tape measure or ruler
    Marker
    Serrated knife
    Sheet of 2-inch-thick foam insulation boards
    Eight 3-1/4-inch nails
    Rubber or latex gloves
    Quikrete Portland cement
    Perlite
    Peat moss
    Reinforced concrete fibers
    Water
    Gallon container
    1/2-inch dowel
    3/8-inch-thick plywood board (2x2 feet)
    Spray bottle
    Sheet of plastic or trash bag
    Wire brush or screwdriver (optional)
    Wheelbarrow
    Hoe
    Trough
    Step 2: Prepare the Mold
      Using the serrated knife, cut insulation into two 16x6-inch pieces and two 18x6-inch pieces. Assemble these four sections into a square or rectangle, depending on how you join the ends. Insert two nails through the insulation material -- one near the top and one near the bottom -- of each intersection.
      Test Garden Tip: For a rectangle, assemble as shown with the 16-inch section outside the 18-inch section. For a square, assemble with the 16-inch section inside the 18-inch section
      Trough
      Step 3: Secure the Mold
        Wrap tape two times around the mold, once near the top and once near the bottom, for added reinforcement.
        Test Garden Tip: Almost any type of tape will work: duct tape, masking tape, or painter's tape
        Trough
    Step 4: Mark a Thickness Line
      Mark a line at least 2 inches from the bottom as a guide to the depth of the hypertufa; this will mark the thickness of the bottom of your trough. Note: If you create a larger container, you'll want a deeper layer of hypertufa to give your trough more support.

      Trough

      Step 5: Mix the Dry Materials
        Put on your gloves and measure 2 gallons cement, 2 gallons perlite, and 4 gallons peat moss. The amount will allow for some left over material to make trough feet. Mix the dry ingredients in your wheelbarrow with the hoe.
        Test Garden Tip: Add 1/3 cup of reinforced concrete fibers to give your hypertufa trough more strength. Find them at building supply stores.

        Trough
        Step 6: Add Water
          Slowly add warm water to the wheelbarrow. Start with about 3 gallons and mix it well with the dry materials. You should end up with a consistency like cookie dough or a graham cracker crust. It should be wet enough to adhere so it doesn't crumble, but not too wet to ooze water. It should be wet enough to hold together when compressed, but not oozing water.
        trough more strength. Find them at building supply stores.

        Trough
        Step 7: Form the Trough
          Set the mold on the plywood board. Begin packing the bottom with the hypertufa mixture, using your previously marked line as a stopping point. Working a small area at a time, use your hands to firmly press the mixture into the bottom corners and up the sides, making sure to mash one section into another for seamless adhesion for a strong trough. Continue up the sides until the sides are covered by a 2-inch-thick layer. Spray water as needed to keep the mixture moist while you are working.
          Test Garden Tip: The plywood board serves as the bottom of the mold and makes transporting the trough easier
      Trough
      Step 8: Add Drainage Holes
        To provide proper drainage, use a dowel to poke holes in the bottom of the trough. Insert the dowel through the hypertufa until it meets the plywood base. Repeat to make six evenly spaced holes. Leave the trough to dry in protected spot.
        Trough
        Step 9: Remove the Mold
          Your trough should dry in about 48 hours. After it's dried and hardened, carefully remove the tape and nails and pull the sides of the mold away from the trough.
          The mold can be used as is. Or if you prefer a textured, aged look for your trough, gently score the exterior with a wire brush or screwdriver.
          Trough

          Step 10: Cure the Trough
            Store the trough in a shady area to cure for 30-60 days. The hypertufa trough gets stronger every day. Your container can be left out in freezing temperatures as long as it is off the ground.
            Test Garden Tip: Spraying with water often decreases the duration of this process to about 30 days

Roasted Garlic-Parmesan Cauliflower

I love roasted cauliflower. My daughter tried this recipe the other day and her family loved it. 


Friday, April 13, 2012

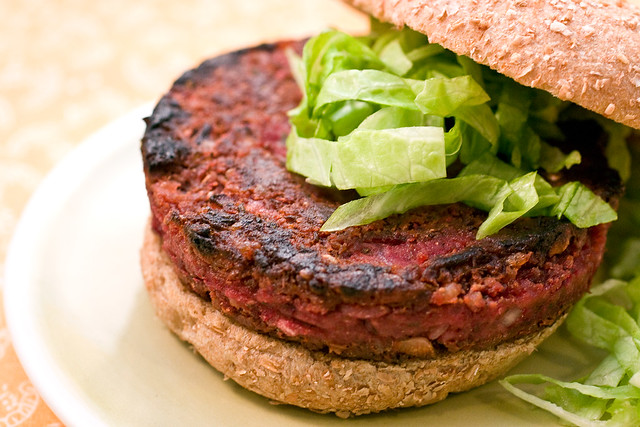
Quarter Pound Beet Burger

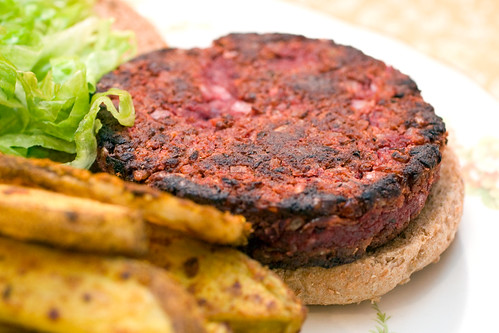
I tried a new veggie burger last night.  It was a beet burger.  I love beets.  My husband, not so much.  He told me one time that he thought beets were a woman thing.  He'll eat them, but that's about it.  Anyway, I made this burger and it was awesome.  My hubbie even liked them.  He's actually very easy to please.
Beet Burger
Recipe notes: If you’d like to make these gluten-free, just use gluten-free breadcrumbs – ground up gluten-free pretzels would be ideal. And if you’d like to bake them instead, do so at 375°, 8 to 10 minutes each side, then stick under the broiler to brown them. If you’d like to use a different nut butter, I would recommend cashew or sunbutter. I used tahini and it worked great.  I think PB will be too strong, but who knows? I use a food processor to make these happen quickly, so you’ll have to do some finagling if you don’t have one. And one last tip: I keep a package of frozen brown rice handy at all times. It’s perfect for occasions like this when you just need a little bit for an ingredient.
And don’t forget the fries! Garlic Curry Fries are perfect with these. OK, it’s burgertime!
Beet Burgers
1 1/4 cups cooked, cooled brown rice (see recipe notes above)
1 cup cooked brown or green lentils, cooled, drained well
1 cup shredded beets
1/2 teaspoon salt
Fresh black pepper
1 teaspoon thyme, rubbed between your fingers
1/2 teaspoon ground fennel (or finely crushed fennel seed)
1 teaspoon dry mustard
3 tablespoons very finely chopped onion
2 cloves garlic, minced
2 tablespoons smooth almond butter
1/2 cup very fine breadcrumbs

Olive oil for the pan
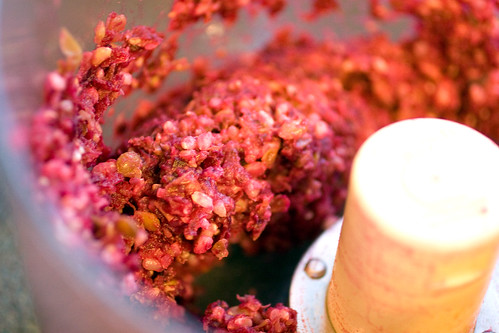
Peel beets and shred with the shredder attachment of your food processor, then set aside. Change the attachment to a metal blade. Pulse the brown rice, shredded beets and lentils about 15 to 20 times, until the mixture comes together, but still has texture. It should look a lot like ground meat:
Ground beet
Now transfer to a mixing bowl and add all the remaining ingredients. Use your hands to mix very well. Everything should be well incorporated, so get in there and take your time, it could take a minute or two.
Place the mixture in the fridge for a half hour to chill.
Preheat a cast iron pan over medium-high. Now form the patties. Each patty will be a heaping 1/2 cup of mixture. To get perfectly shaped patties, use a 3 1/2 inch cookie cutter or ring mold. Otherwise, just shape them into burgers with your hands.
Pour a very thin layer of oil into the pan and cook patties for about 12 minutes, flipping occasionally. Do two at a time if you’re pan isn’t big enough. Drizzle in a little more oil or use a bottle of organic cooking spray as needed. Burgers should be charred at the edges and heated through.
Serve immediately. But they taste pretty great heated up as well, so if you want to cook them in advance, refrigerate, then gently heat in the pan later on, then that is cool, too.  I served them on a homemade hamburger bun with spinach, dill pickles and red onions.  It was awesome.  I'll post the recipe for the whole wheat hamburger buns later.  Have a good day.  Enjoy!!!!

Thursday, April 12, 2012

Sourdough Whole Wheat Bread

My Whole Wheat Sourdough Starter
Well, today was baking day.  The weather if FINALLY getting a little warmer so I decided to make a large batch of bread today so I wouldn't have to bake for a couple of weeks.  I've been doing sourdough because my husband is prediabetic and we have found that sourdough bread doesn't raise his blood sugars.


This is the recipe that I used. I actually doubled this recipe.  Well, it was probably more than double because, when I make bread, I tend to add lots of extras.  Today I added some 10 grain cereal and decided to cook it before I put it in.  But, I decided to do it after I had put all my water in.  So, I probably did 2 1/2 times the original recipe.  I got 8 loaves and 9 sandwich thins.

Beth's 100% Whole Wheat Sourdough Bread
3 3/4 cups filtered water ( room temp.)
5 tablespoons honey
5 cups freshly milled whole wheat flour ( packaged is fine, though)
1 1/2 cup sourdough starter, at its peak ( whole wheat starter works best)
2 T. yeast
5 tablespoons oil
3 3/4 teaspoons salt (I usually cut that in half or use Kosher salt)
5 teaspoons bread enhancer
8 tablespoons vital wheat gluten
7-9 cups freshly milled whole wheat flour
The following can be added to substitute some of the flour. Can use all or part)
2 T. wheat germ
1 c. 9 grain cereal
1/3 c. amaranth seeds
1/3 c. quinoa (these are best ground up or cooked first)
¼ c. Pumpkin seeds
2 T. Sesame seeds
¼ c. Sunflower seeds
4 T. ground flax seeds
2 c. regular oatmeal
1/3 c. chia seeds
The afternoon before you want bread, feed your starter 1 cup water and 1 cup flour (not included in recipe ingredients). That evening, when it is all bubbly and active, combine the first 4 ingredients in a large bowl, cover loosely, and allow to get bubbly like a fed starter does but not at it's peak yet (about 5 hours). This is essentially a sponge.
(Most of the time I just do my starter the night before and do everything else the next morning.)
Next morning add remaining ingredients. Knead until the gluten is developed can see about 6-8 min in a bread machine (not the 1 loaf bread makers). I let the dough rest for about 15 minutes.   Divide into loaves and shape, placing them into 8.5 x 4.5 greased bread pans (they will be smallish loaves). I weigh out my dough and use 2 lbs. of dough per loaf. Allow to rise until doubled. Bake at 350 for 30-40 minute. I use a thermometer to measure the internal temperature of the loaves.  I bake them until it reaches 180°. Remove from pans immediately and cool on a wire rack.

This is my bread machine.  It can make about 10 loaves of bread at a time.  When my kids were all home I made bread about once a week.  The big bowl was nice. 
This what my dough looked like after 15 minutes.
I use a kitchen scraper to divide my dough.

I then weigh out the dough.  2 lbs. per loaf


I also made sandwich thins (similar to the ones you buy at Costco).
I weighed out 3 1/2 oz. of dough, rolled them in a ball and then flattened them out on a cookie sheet.


Dough flattened out for sandwich thins.
I baked sandwich thins for 15 minutes at 350°.
Loaves raising before going in the oven.


Tuesday, April 10, 2012

Newspaper pots for starting Seeds


I started making these little pots a few years ago and can't tell you how many I have made.  I was really interested in a soil blocker to make individual pots.  I invested in a small one and don't really care for it.  I then decided that these little pots would work very well.


1. Take a section of newspaper.  The colored ads don't work as well as the regular black and white sections.  They don't absorb the water was well because they have a finish on them.


2. I use my scrapbooking cutter and cut several layers at a time. 


3. I cut them about 5"x9". Fold down about 1/3 of the paper (lengthwise)


4. Take a small round container, I use a empty toilet paper roll.  You could use a spice jar too. Roll the paper around it, leaving about an inch overhang at one end where you will fold it in for the bottom. Don’t roll too tight or it will be too hard to get the tube out later:

5. Fold the bottom in, as if you were wrapping a present:

6. Tape (masking tape would have been more biodegradeable):

7. Take out the roll. Turning it right side up.
8. Repeat:


9.  Fill the pots with soil and add your seeds.  I planted a whole tray of green beans, and one of corn, and one of peas.  I have found if I start them ahead of time it gives me a great jumpstart on my garden.  Living in North Idaho I need all the help I can get. 


Pictures are from the following website:
http://littlehouseinthesuburbs.com/2009/02/newspaper-seedling-pots.html